As soon as I pulled this picture’s negative from the developing tank, I knew there was a vignette. It was pretty obvious to see. I’ve cropped in a little and also used some Lightroom wizardy (well, half-assed messing about with sliders) to remove the worst of it, but it’s still plainly apparent in the top corners of the image.
The reason for the vignette is that I used quite a lot of front rise when composing the shot to get the church framed in the centre of the image vertically. My vantage point was from the bottom of the churchyard, which is down a slope, so the front rise allowed me to prevent converging verticals.
Lenses used in 4×5 photogrphy need to have an image circle of 153mm in order to cover the whole sheet of film. As soon as you start to use camera movements, this image circle needs to be larger to accomodate them. My 135mm lens has an image circle of 206mm, which is more than sufficient to cover the film and use a range of movements, but only within certain limits. So, once I use more than around 35mm of front rise (when the front standard where the lens is mounted is raised), the edges of the image circle begin to impinge on the film, leaving an unexposed vignette.
This vignette can be seen on the ground glass, or by other methods, when composing the shot. That is, if you’re paying proper attention. Which I wasn’t.
Another lesson learnt, but the picture isn’t too badly affected, luckily.
If you’ve followed this blog during the past six months, you’ll probably know that I took my first steps into the world of large format photography this year. Just before Christmas I bought a used Chroma 4×5 camera along with a lens and a bunch of film and other accessories. While I’ve had successes with the Chroma, I’ve also had issues in the form of light leaks.
I should note that I don’t believe that this reflects on teh quality of the Chroma camera itself, not the company that produced it – the owner was very kind and helpful when I spoke with him, despite my camera being second-hand and not having been bought direct from him. Rather I think that my own camer has been damaged in some way at some point.
It’s now boxed up unitil such a time that I can try to pin down and rectify the source of the light leak. I’ve made a number of attempts to do so, but without success, and the cost of wasted film, developer, and – perhaps most importantly to me – time, has become too much for the time being.
I’ve not stopped wanting to shoot large format though, so had made enquiries to borrow a camera from someone I know. While that was taking place, I spotted a used Chamonix 045N-1 camera for sale at a specialist retailer, and was tempted. While it was more than I had been considering spending, it was a good price. Plus I should get my bonus this month. And so, worried that someone else would get the jump on me, I took the plunge and bought my second 4×5 camera.
The 045N-1 is, I believe, the entry-level 4×5 camera in Chamonix’s range. It has been superceded by the N-2 camera, but still remains very capable. It’s easy to set up, and while it lacks a couple of features that my Chroma has, it’s a much more solid camera and as a result easier to use. Some things that I found a little fiddy with the Chroma, are notably improved here – as you would expect given the higher cost. The camera feels completely solid, while there was always a bit of wiggle with my Chroma and, given how much difference a tiny amount of movement can make in terms of fine focus, this adds a great deal of confidence that what I see is what I will get when taking pictures. Inserting film holders is also much better with the Chamonix – they slide into the camera back with a buttery smoothness which, again, gives me confidence that I’m not knocking my composition out of whack.
I took the camera out for some test shots yesterday. Not too far from home as I was still slightly paranoid that the light leaks I’d had with the Chroma might not be the camera’s fault and instead produced by one of my film holders or something, so I drove out to photograph a few places I’ve visited before. The camera was pleasant to use, although I’m sure I’ll get more adept at setting it all up as I use it more – I was still a bit fingers-and-thumbs on this outing.
I developed the four sheets I took this morning and it was a great relief to see that, despite using the camera in very bright, direct sunlight, there were no signs of any light leaks when I pulled the negatives from the developing tank.
Here are a couple of the resulting images. Perhaps not prize winners, but I’m happy with them.
This is the last of the four large-format air museum pictures that I was able to salvage. The other four are just too much of a PITA for me to try and remedy the light leaks, This is the only HP5+image that I think passes muster – and it’s the one where the light leak is probably most obvious, despite my attempts to hide it. I still think I somehow managed a pretty good rescue attempt though.
The aircraft in the picture is an Avro Shackleton, a post-WWII aircraft developed for anti-submarine warfare and maritime patrol duties. 185 aircraft were produced.
Another of my rescued 4×5 sheets. Of the eight I shot I’ve managed to recover four to an extent that I’m happy with, or at least happy enought to publish. I only managed to fix one of the HP5+ sheets – the others being beyond the limits of my Photoshop skills or, perhaps more likely, my patience.
The picture today, of a Westland Wessex helicopter is one of the least affected images, but not perfect. This one was affected by the loose tripod as much as by the light-leak. The original image on the ground glass included all of the tarpaulin-covered object that is now partly cut off at the bottom left side of the frame whereas the negative included a lot of additional scenery on the right side which I’ve cropped out. It still works as a picture though.
This version of the Wessex is the HC2 which was designed as a troop transport, able to carry 16 troops.
The Avro Ashton fuselage featured in yesterday’s post can be seen in the background.
Another rescued large format photo. A number of the images were less badly affected by the light leaks than others, this one included, and it’s difficult to see it at all now (although, again, there has been some cropping involved).
The aircraft in the picture is an Avro Ashton Mk 2 jet airliner (or the fuselage of one, at least). The Ashton was developed in the 1950s as an experimental aircraft using the airframes from Avro 689 Tudor II piston-driven airliners and was never intended to go into commercial service. Only six were built. The fuselage here is from the second of the six aircraft.
The photograph presented here today, of a post-war DeHaviland Dove passenger aircraft, is one of the 4×5 frames I shot at Newark Air Museum last Friday.
The eagle-eyed amongst you might have noted that this is not a 4×5 aspect ratio picture. This is because it was affected by the light-leak and the loose tripod column I moaned about the other day. The light leak has been largely recovered using graduated masks in Lightroom. It’s still there, but you’ll prbably only spot it if you look very closely (or know where it is). The composition has been, well, not rcovered, so much as salvaged by way of a significant crop. The full frame has the aircraft nose off-centre by a significant margin and one of the propellers fully in-shot. In the end I decided that this panoramic format was the best option.
It isn’t the picture I envisioned, but it’s better than no picture at all.
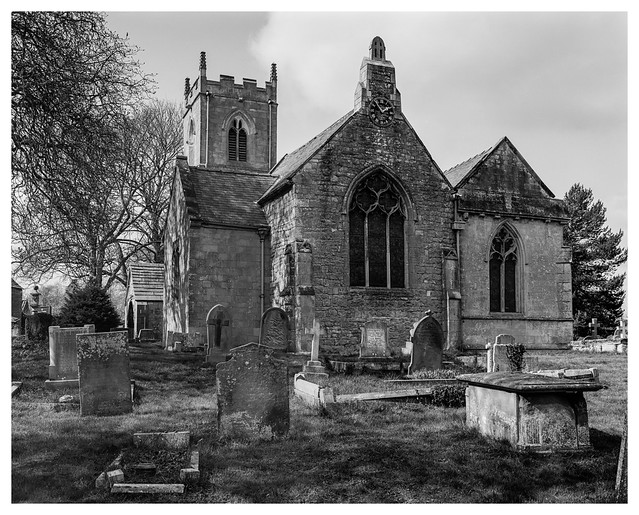
Another church, and another named after St. Peter just a couple of days after I posted a photo of its namesake at Elmton.
Quite a difference in architecture between the two buildings though.
When dust-spotting the scan I spotted a lone pigeon hiding in the scene. Can you spot it? You’ll probably need to click through to Flickr to see the full resolution version in order to find it though.
I’m now very much looking forward to the four days off work that the extended Easter weekend will bring. I’m hoping to do some more photography if the weather remains decent.
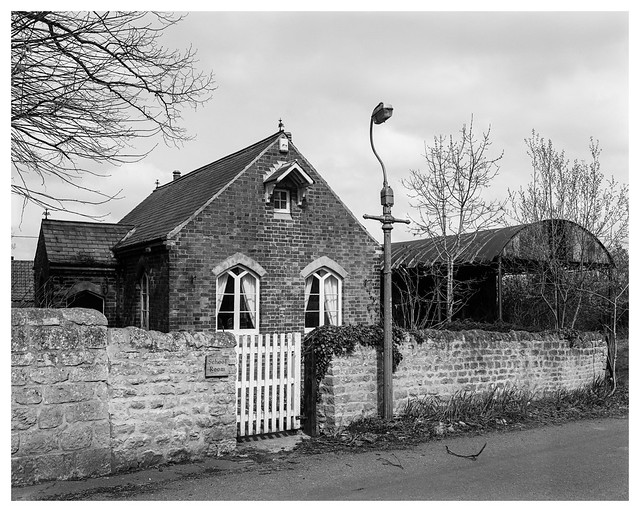
I can’t say that I know very much about this building beyond that it was renovated in recent years for community use and that, in the past, it was almost certainly and actual school building.
It’s an attractive structure though.
Although this picture below was shot on 4×5 sheet film, I have a very similar picture that I shot on a Ricoh GR III back in the summer of 2021. While the large format film photo is sharper and has more detail, there’s not a lot in it considering the GR III is an APS-C crop-sensor camera. This should all be balanced out by the fact that my large format negatives are scanned at home using an Epson V700 flatbed scanner at 2400dpi. It produces scans that meet my needs admirably, but I doubt it really compares to something like a Nikon Coolscan or, at the top end of the scale something like a Flextight or a proper wet-mounted drum scan.
I don’t shoot film for it’s sharpness though. I like nice sharp images, and 4×5 certainly provides that over and above medium format, and certainly 135 format, but it’s really about the experience, how I feel when using and shooting film, and the pleasure I get when I see the results. So, while I like the pictures my GR III makes, and it’s a very convenient camera to carry, it’s not usually the one I reach for when I want to go and make photos.
The picture today is of St. Peter’s church at Elmton. The church (including a similar photo on 35mm film) has featured on the blog before (here, here, here, and here).
On this occasion I had my 4×5 large format camera with me. I only have one lens for this camera at present – a Fujinon 135mm f/5.6. The lens is roughly equivalent to a 40mm focal length on a 35mm or full-frame digital camera. It’s a nice focal length and one I use a lot – many of my compact cameras have focal ranges that are similar, so the field of view it affords is one that I am used to, and I’m a regular proponent of the “zoom with your feet” school of thought.
Sometimes though, a fixed prime lens has it’s downsides – noteably when the ol’ zooming with your feet option doesn’t work. I’ve yet to find a way of zooming backwards through walls, or floating up and over unavoidable obstacles obstructing my field of view. I’d an idea of getting a picture of the church incorporating the low tower, either side on, or from the fron of the building but, alas, the 135mm wasn’t wide enough for this and the church is a little awkwardly positioned in terms of available longer vantagepoints.
And so the composition you see below was the best I could get on the day. I might have gotten something different from the other side of the church, but that would have meant most of the visible part of the building would have been in shadow. I think this composition still works though. You can just see the tower peeping up at the left of the structure, and the rear of the church has plenty of interest, including the weathered gravestones. The angle also means I got some nice contrast and relief shadows that I wouldn’t have had from a side-on view of the church.
The weather yesterday was good for once. Paired with the fact that it was a Sunday and I wasn’t at work, I felt almost duty bound to make use of it and go out with a camera.
As I’ve not shot the 4×5 for a few weeks and I’m still in the “getting to know you” phase of figuring out how to use it while still trying to make interesting pictures, I got the kit together and headed out. It was late morning before I had chance to set off as my dad came over for his usual Sunday visit first thing so I decided to stay relatively local and headed out to a couple of villages and other places I’ve photographed previously, albeit not with large format.
I only shot four sheets, although, given how long it takes to shoot 4×5, I was still out for over two hours even though I shot two of the pictures walking distance apart, and the other two were at locations not that far away by car.
I had a chance to develop the photos this lunchtime (the benefits of working from home) and they all looked good apart from the picture featured today – which had a large light leak down the left third of the image. I’m not sure if one of my film holders is a bit tempremental and prone to light leaks, or if I’d not been sufficiently careful when removing or re-inserting the dark slide when taking the photograph.
Luckily for me, the image could be salvaged with a crop. The original frame has all the house in the composition, plus a garage and part of a tree down the left of the property. The crop removes that completely but still manages to leave a pretty nice picture. At least I think it does. The 4×5 format means there’s still an absolute ton of detail in the remaining part of the image too.
The wheelie-bin isn’t the most attractive thing, but cropping that out too unbalanced the picture a bit too much for my taste.