35mm · Film photography · Photography

An upgrade to my scanning system – Part 1 the journey to date

My scanning journey has been an evolving beast over the past ten years of film shooting. My first scanner was a Canoscan LIDE which could only scan prints, not negatives, and it wasn’t long before I moved to a proper negative scanning solution in the form of an Epson V550 flatbed. The flatbed was ok for a starting point: not too expensive and the results were much better than from a scan of a lab print, but over time I became dissatisfied with the scans – there was a slight mushiness to them that I knew could be improved upon.

So I upgraded. The next machine was a Plustek 8100 35mm scanner. This didn’t have the ability to scan medium format (I still use a flatbed for that job for now, although using a V850 these days), but marked a noticeable improvement in scan quality over the V550. Gone was the mushiness, and a higher usable resolution of 3600dpi meant more detail could be drawn from my negatives. The Plustek required manual intervention, with each frame having to be pushed into the scanner in the film holder, but this wasn’t a problem and the scans were pretty quick.

It was at this point that I became dissatisfied with the colours I could achieve from home scanning and, for a while, I resorted to getting lab scans for colour film. This led to a parallel journey in conversion software as I attempted to find a solution that would give me the coulours I desired. Eventually I decided on Negative Lab Pro, which I’ve used ever since and which, the odd film stock or tricky frame aside, produces results I’m happy with.

The Plustek continued to serve me well until I began to notice a slight softness at one side of the scanned frames. This is very subtle, and perhaps most people would neither notice nor care, but once I saw it, it couldn’t be unseen, and (after unsuccessfully trying to resolve the issue) the itch to find another solution began.

Next came a Reflecta (Pacific Imaging to my friends across the Atlantic) – a Proscan 10T. This had a higher effective resolution over the Plustek – 4000dpi this time – plus a higher DMAX to garner some additional detail in the shadows. This scanner can produce really nice results but it’s not user friendly – on the surface it works similarly to the Plustek with a film holder that is slid into the scanner one frame at a time but, where the Plustek clicks nicely into place when the frame is properly positioned, the Reflecta 10T required you to look through a small window on the top of the device and position the frame by eye. After a while you get a feel for the correct positioning, but there are many times where you have to keep re-previewing the image to avoid cropping one edge or the other. The scanner (or mine, at least) is incredibly slow – sometimes taking over 10 minutes to scan a single frame! But there was another issue with my scanner… Banding.

On areas with low contrast areas – usually skies – faint but noticeable banding can be seen on the scan. It’s not an issue at all on busy scenes, where it is effectively camouflaged, or (for some reason I’ve not worked out) colour scans, where the banding doesn’t seem to occur at all. But I shoot a lot of black and white film, and a lot of those feature the sky, so the dissatisfaction resurfaced once more.

So the search for something better began again. The only real options available to me were a used small professional scanner such as a Nikon Coolscan model, or the world of DSLR scanning solutions. The Nikons get very good word of mouth, but the better models are expensive and are all at least twenty years old, meaning there’s always the risk of them conking out or needing specialist maintenance or repair so, while it wasn’t off the cards, I felt DSLR scanning might be a better choice and is the route I’ve taken.

I’ll reveal my setup tomorrow..

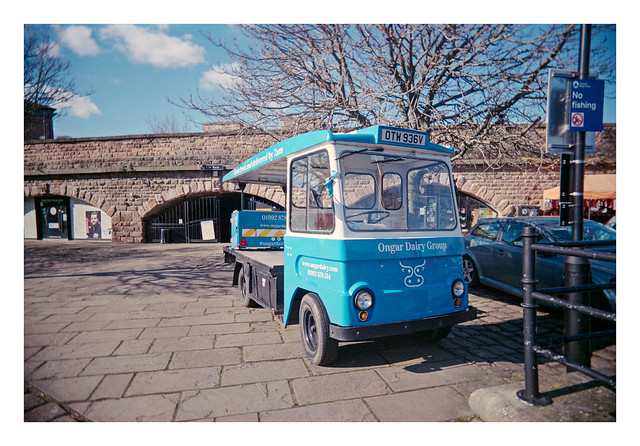
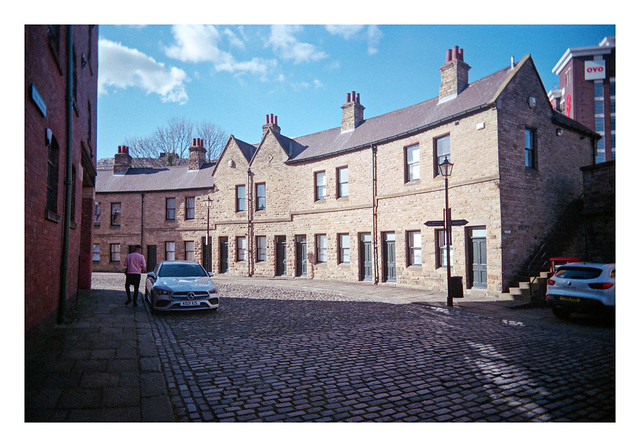
As I always post a picture in these posts, here’s an old image I’ve re-scanned with the new setup. It’s perhaps not the most exciting image, but it’s the sort of thing I’m glad to have photographed as this scene no longer exists, this street having been re-developed over the past few years (the picture is nearly 10 years old). You can see how it looks today (or on the last occasion the Google Maps car drove past) here.

FILM - Herbert Brown

Olympus 35 RC & Agfa Vista Plus 200. Lab developed. Home scanned and converted with Negative Lab Pro.

Taken on 13 September 2016

35mm · Film photography · Photography

Milk float

I had a longer post planned today about my experience with a film stock I’ve not used before but, as time is ticking on and I have that chilled out Friday feeling, I think it will have to wait until the weekend.

Instead one of my shorter form posts, this time with another of the RETO Ultrawide & Slim pictures from my first test roll.

When I was young most people would have their milk delivered by a vehicle similar to this. Electric powered milk floats whirring around the early morning streets, crates of glass milk bottles clinking about on the back, stopping for the white-coated “milkie” to deliver each home’s order to the doorstep where it would wait to be fetched inside. Sometimes, on cold days, the milk would freeze and the foil tops would be pushed off the bottles by the expanding ice. Sometimes greedy birds would peck at the foil to get at the rich cream at the neck of the bottle (none of the homogenised stuff that we get today back then).

Ongar Dairy Group

Reto Ultrawide & Slim & Agfa Vista Plus 200. Lab developed.

Taken on 6 March 2022

35mm · Film photography · Photography

More colour from the Reto Ultrawide & Slim (and a new colour film choice from Kodak)

I was pleasantly surprised to hear today that Kodak is introducing a new 120 film choice. Or rather an existing film in 120 format in the guise of it’s consumer grade Kodak Gold. I’ve wished for a lower-cost alternative to Kodak (and Fuji’s) pro-grade films for medium format use so this is great to hear. Of course, here in 2022, Kodak Gold in 120 format is more expensive than Portra or Ektar were just a few years ago, but that seems par for the course at present.

I quite like Kodak Gold in 135 format (although I’ve tended to use Colorplus more), so I’ve splashed out on a pre-order of the 120 format Gold to see how it fares. Hopefully it’ll be in my hands sometime in early April. All things considered though, if colour film maintains its high price point then I’m likely to err even more strongly to my preferred black and white choices purely from an affordability standpoint, with my colour film use limited to where I know it’ll really be worthwhile. I tend to shoot much more black and white anyway so my current stocks of colour film are likely to keep me going for a while yet.

Another colour photo from the Reto Ultrawide & Slim today, and one which exemplifies how much of a scene is omitted when seen through the camera’s viewfinder. In this shot I had composed the scene to include the main arch and the smaller arch to the right. The leftmost arch, the person walking into frame left, and the rear of the car on the right were not present in the viewfinder. I guess I will begin to factor this in as I become more familiar with the camera over time.

Wicker Arches

Reto Ultrawide & Slim & Agfa Vista Plus 200. Lab developed.

Taken on 6 March 2022

35mm · Film photography · Photography

The Reto Ultrawide & Slim film camera – first impressions

A month or two ago I became aware that a new film camera was about to launch. As with most new film cameras these days, this was not to be an SLR, rangefinder, or fully-featured compact point and shoot, but something rather more basic in the shape of the Reto Ultrawide & Slim.

There have been a number of other back-to-basics cameras launched in the last year or two, but these have mostly been in the form of re-useable disposable cameras (if that makes sense – basically the same features as a standard disposable film camera, but with the facility to re-load with normal rolls of 35mm film. More cost effective and flexible in the long term, and also better for the environment.).

Under blue skies
This wouldn’t have been possible without the 22mm lens.

In terms of build, the Reto Ultrawide & Slim (UWS) is probably no more advanced than the aforementioned cameras. It’s almost completely made of plastic, including its lens. But in this case, it’s the lens that matters because, while most other cameras of this ilk use 35-40mm focal lengths, the Reto UWS packs a very wide by comparison 22mm lens, making it something of a stand-out amongst it’s competitors.

Uncorrected verticals
This one managed to find its way into Flicke Explore!

The camera itself is not a new design. It’s a clone of the Vivitar Ultrawide & Slim which was released back in the 1990s, manufactured by Chinese company Sunpet and marketed under the Vivitar brand. The Reto version isn’t even the first clone and another version produced under the Superheadz brand was also available for a while. Despite the different variants, all the cameras appear to be identical in terms of functionality, with the only differences being cosmetic.

In terms of specs, the camera uses the aforementioned 22mm lens – this is an uncoated 2-element design fixed at f/11 and constructed of resin. The shutter is likewise fixed to a single speed of 1/125 sec. The focus is fixed and reaches from 1m to infinity. Controls on the camera consist of a shutter button, a film-advance wheel, a film-release button, the rewind crank, and a switch to open the camera back for loading and unloading the film.

The fixed aperture and shutter speed are likely to dictate the film you choose to shoot. On bright days then a 200 or even 100asa film is probably fine (all the shots here are on 200asa colour negative film), but faster film will be a necessity when the light isn’t as good, probably going beyond 400asa in the conditions we often find here in the UK.

Stilts'n'Crepes
The person exiting frame left was definitely not visible in the viewfinder when the shot was made.

The build quality of the camera isn’t something that inspires confidence. The almost fully plastic build is very lightweight (the camera feels like it would blow away in a light breeze) and I’ve seen a number of places advising that it’s best to limit film to 24exp rolls as longer lengths can put unwanted strain on the advance mechanism (which I presume is also mostly plastic). I guess that time will tell as to how well it’s construction fares – so far I’ve put two rolls through mine, a 24exp roll and then, being the daredevil that I am, a high-risk 36exp roll. Neither posed any problems, although I could feel the tension (literally!) when winding on the final few frames from the longer film.

Passing the town hall

In terms of use, there’s not a lot to say. Loading film is easy – the rewind ratchet is a very simple design and is basically held in the camera by a plastic lug, but it works well enough. The shutter button is responsive and the shutter itself makes a quiet but satisfying click when fired. The advance wheel also works well, with the caveat that it did feel much tighter towards the end of the 36exp roll of film I shot, and I expect this might be a potential point of failure. Rewinding the film is likewise straightforward. The door release switch works fine, but I find that it doesn’t spring the door open and I have to pick at it with a fingernail to get inside.

Blonk Street

So, most importantly, what are the photographs like? Well, that will always be a subjective opinion, but in my case I’m very happy with them. The lens has some notable shortcomings in the amount it vignettes (although nothing like as much as a Holga 120 or something like that), and also the drop off in sharpness at the edges of the frame. Both these things could also be said to add charm to the resulting images though. In the centre of the frame the lens is plenty sharp enough and equals some more advanced and fully featured point-and-shoot cameras I’ve used. It’s the 22mm focal length that is the big draw here though. Coupled with the f/11 aperture and deep depth of field, it can allow interesting compositional choices to be made and I expect that I will continue to use it for this reason.

Cobbled corner

Beyond the build quality there are a couple of other downsides to be aware of however. The first is the viewfinder. While it’s bright and easy to use, even for a spectacles wearer like myself, its coverage does not represent the full field of view of the lens, meaning that it’s very easy to get unwanted elements creeping into the edge of your compositions. This includes fingers! The lens is also very prone to flare apparently, although I deliberately chose my shots to try and minimise this. I have also found that the first roll of film I had developed had scratches on a number of frames but, giving the benefit of the doubt, I’ll wait to see if it’s repeated on the next roll before laying the blame on the camera for this. The scratches were rectified easily enough in Photoshop.

Finger alert!!!

Is the camera worth buying? Again that’s a very subjective question. If you live for crisp, sharp, high quality results with a range of controls and features to aid your photography, then probably not. If you enjoy the simple creative options that ‘toy’ cameras such as this offer, then you’ll be fully in your element. At £30 it’s relatively cheap to buy (although that doesn’t mean it’s actually worth that amount) and problably more affordable than the older Vivitar version which seemed to have been fetching much higher prices due to its popularity. I’m so far happy with mine and glad I bought it.

City totem

There are undoubtedly a lot of reviews and first impressions of this little camera popping up online, but here are a couple from my fellow bloggers Jim Grey and adventurepdx that are worth reading.

Reto Ultrawide & Slim & Agfa Vista Plus 200. Lab developed.

Taken in March 2022

35mm · Film photography · Photography

Old weathered bench

There are a number of these benches dotted aroung the edge of the lakes at Rother Valley Country park. I’m unsure as to when they were installed, but they certainly look like they’ve seen their share of the elements. The park is almost 40 years old now, but I’m not sure if the benches have been there all that time.

Weathered wooden bench

I’ve photographed them before on previous occasions. The shot below was originally posted on here back in 2017.

FILM - Experiments with a cheap plastic camera-2

First picture: Pentax P30T, Rikenon 50mm f/2 & Ilford HP5+. Ilfotec DD-X 1+4 9 mins @ 20°.

Taken on 2 May 2020

35mm · Film photography · Photography

Tree-o

One of the cameras I picked up at a car-boot sale the other week was an Olympus OM-10. It came with a Zuiko 50mm f/1.8 lens (that was clean but faulty) and the manual adapter that plugs into the front of the camera to convert it, as you might expect, so that it can be used fully manually.

The light-seals looked like they’d seen better days – just a thin, plasticky coating remained in most cases – so I took the time to remove the old material and fit new seals. When that was done, there was nothing more than to take it out for a test.

Comparing it to my OM-1, the OM-10 feels somewhat flimsy. Not so much in its weight of the feel of the body, but the dials feel looser and far less well constructed than the other camera. Despite this slight misgiving, everything on the camera appears to work ok, and the roll came back from processing with no unexpected issues.

I’d used a Cimko 28mm f/2.8  lens that I bought from a chap on a forum a year or so back. The first results with the lens (on the OM-1) had been disappointing – most of the shots were soft compared to the Zuiko 28mm f/3.5 I also own – but having recently re-scanned some of the photos on the Plustek, it’s become apparent that it was my scanning that was to blame. The Plustek holders keep the negatives much flatter than my Epson V550 holders, and I think the original softness had been the result of slightly bowed negatives. As the Cimko has a nice “macro” mode, this is good to know as it gives me some additional flexibility in the shots I can take with my Olympus cameras.

The shot I’m sharing today is nice and sharp. I converted it to black and white in Lightroom as, although it was taken in some soft golden-hour light with a lovely warm glow, the mono image just has more punch to it, which I prefer.

FILM - Tree-o

Olympus OM-10, Cimko 28mm f/2.8 & Agfa Vista Plus 200 (converted to B&W in Lightroom).

Taken on 19 April 2019

35mm · Film photography · Photography

Leading lines and power lines

Or is it “lead-in” lines? Or does it matter, both seem to be correct anyway?

This was taken while out on a walk about a year ago and has just been re-scanned on my Plustek 8100. The colours look far better and much more natural now, as does the sharpness of the image (albeit the focus is more on the barley than the distant pylons).

Anyway, it’s quite a nice image, I think.

FILM - Pylon fields

Canon Sure Shot Telemax & Agfa Vista Plus 200.

Taken in April 2018 (I think!)