While I’m sure that this little boat once served some actual water-borne purpose, it now looks to serve as decoration for this building which houses a shop, a cafe, and I believe, the inshore rescue service.
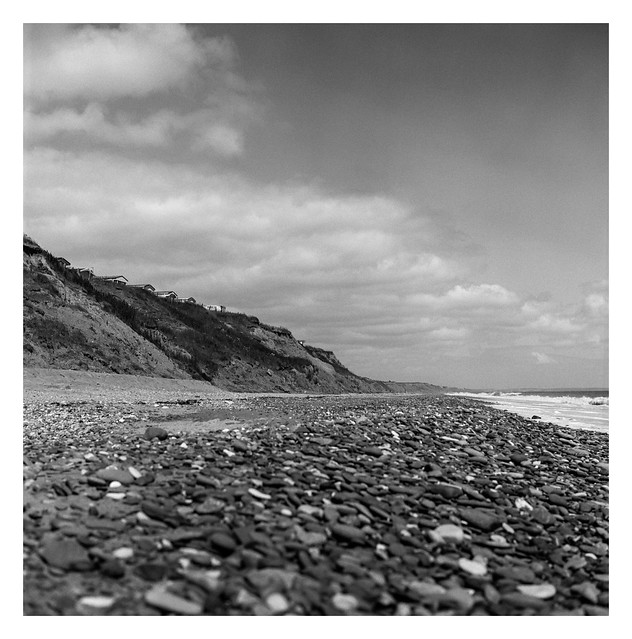
I spoke a little about the erosion that is taking place on the shoreline of Yorkshire’s east coast the other day. These two pictures show how close to the edge some of these caravans are sat. While they no doubt have wonderful views out over the North Sea, I think I’d be tempted to move to a new pitch if I was the owner.
This video gives a good view of just how parlous the situation is for structures placed close to the cliff tops in this region.
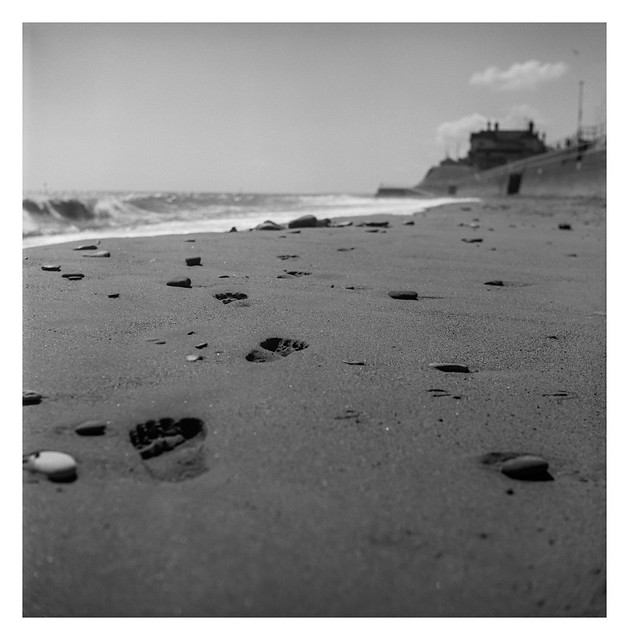
Someone had been walking barefoot across the beach at Hornsea on the day I visited. Whoever they were, they had moved out of sight before I came across their tracks.
I like this picture but can’t help but think that there was a better one to be had. I wanted to keep the building in frame at the upper right, and I wanted a crashing wave as well, both of which I’m happy with, but the placement of the footprints isn’t quite how I’d like it.
Scenes like this require care. walk into the scene and, to quote Joel Meyerovitz, it becomes bruised – in this case the risk that the smooth sand becomes tarnished with my own footprints as well as the unknown walker’s. Maybe I should have sought out more patience but, as usual when I visit somewhere that’s not as easy to get to, I like to try and maximise my value from the day and see as much as I can, which means I tend not to hang around a sinmgle location of photo opportunity for too long. Perhaps I would improve my photography if I did.
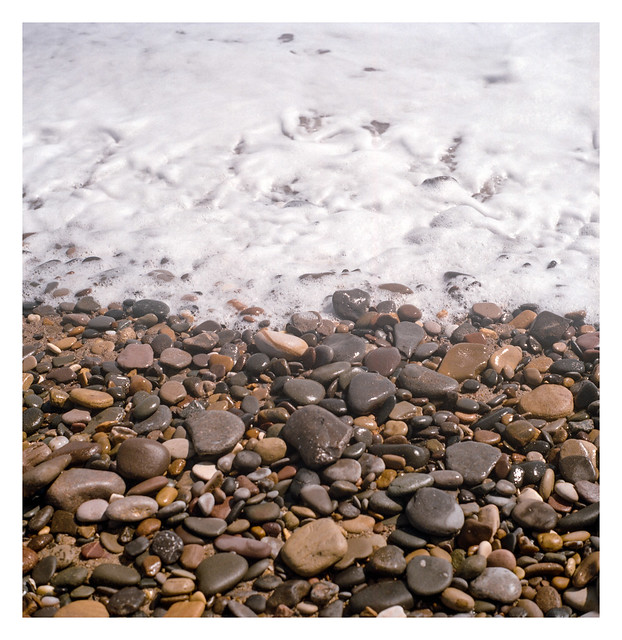
The beach at Hornsea has a lot of pebbles, no doubt in part because of the coastal erosion that is taking place in the region. Pebbles are interesting to look at, with an endless array of shapes, sizes, colours and textures. The colours are multiplied further when the pebbles become wet, their tones becoming more saturated, fragments of minerals sparkling in the sunlight, and some taking on a crystaline, semi-translucent appearance.
I wondered as I stood there, how long the process of taking a rough chunk of rock and smoothing it to an organically sleek pebble would take. “How long is a piece of string?” might be a suitable retort as, given the range of different types of rock and mineral, plus the fact that the process never ends, each individual piece being constantly weathered until it becomes sand, but it’s still something that I expect will take a considerable duration.
So I was quite surprised to see a large pebble formed out of a section of brickwork, complete with mortar holding the components together. While I’ve no idea when this chunk of masonry began it’s transformation, I expect it’s far more recent than I might have expected. I took a phot of the brick-pebble but it’s on a roll of film I’ve yet to develop. Hopefully, if it has worked out ok, I’ll post it on the blog.
Yashicamat 124G & Kodak Gold 200. Lab developed. Home scanned and converted with Negative Lab Pro.
I visited the seaside town of Hornsea earlier this week. It’s the first time I’ve ever been – most of my seaside visits to the east coast being either the Lincolnshire resort towns of Mablethorpe and Skegness, or the Yorkshire towns of Bridlington, Filey, Scarborough & Whitby, which are further north from Hornsea.
It’s not a large town and the seaside facilities are more down-key than the other resorts I’ve mentioned. There was a single arcade that I saw, but no sign of any fairground or other attractions that might attract younger visitors. The beach was nice, a combination of sand and pebbles punctuated by groynes, and the main part of the sea-front where the promenade sits, has a sea wall. The reason for this was quite obvious on the day I visited as, while not a stormy day by any account, the waves were striking the wall with some force when I arrived with plumes of white spay shooting up above the top od the defenses and blowing back onto the promenade area in places. Further north and south of the town where the defences are not present it was plain to see how the coast is being eroded by the waves, and the earthen cliffs had a crumbled appearance. Perched atop these cliffs were a number of caravans belonging to a couple of large caravan sites either side of the town.
I didn’t really explore the town centre itself, which is a little way back from the sea front, but what I saw looked nice and I did take a few photos before I left.
The photo today shows a shop close to the promenade, it’s window packed with the sort of things that you only tend to find in seaside towns, along with the requisite fishing nets, windmills, and ice cream signs (although oddly, given the name of the shop, no buckets and spades on view).
There will be more photos from Hornsea to come…
Yashicamat 124G & Kodak Gold 200. Lab developed. Home scanned and converted with Negative Lab Pro.
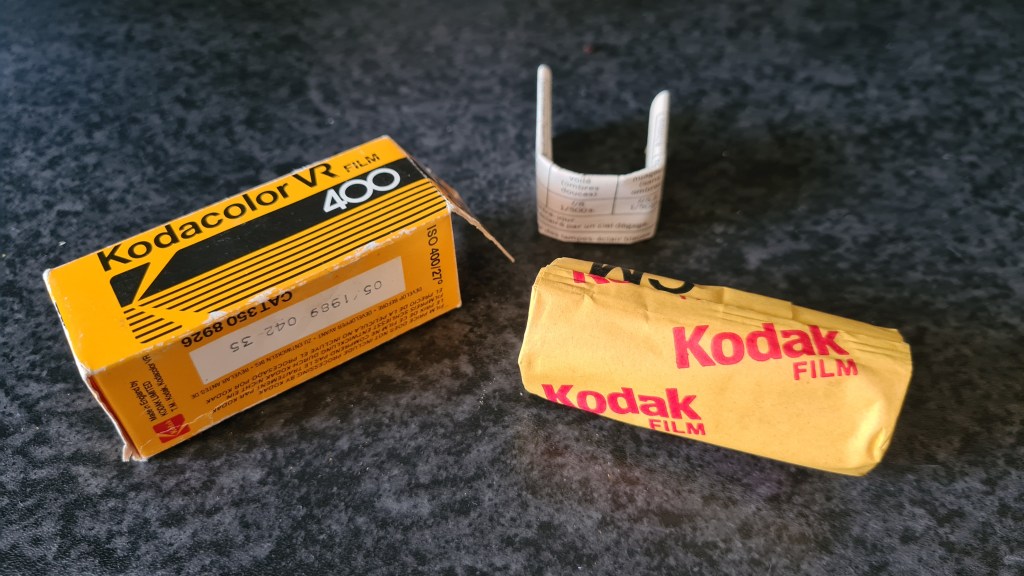
This is the second in my series of expired film shoots. You can find a link to the others at the bottom of this post.
This second roll is a little younger than the last one I shot, but not by a huge margin, and it’s still over thirty years beyond it’s expiry date. It’s also a colour film, a fact that I’ve found can more adversely affect the resulting photographs. I find that expired black and white film is generally far more forgiving than colour. There are a number of things that can go awry with either format but, in general, it’s much easier to overlook a change in tonality in black and white than it is in colour. The reason is in the name: colour. While most people probably can’t tell if a greyscale tone is not totally accurate, they are far more atuned to when colours don’t look right, and expired colour film can bring a whole range of potential colour defects to bear on an image, with deterioration of the different dye layers resulting in a range of colour changes that the human eye easily picks up on.
An increase in grain is another thing that can occur with expired film and, again, is something that is less of a problem in black and white than colour. Sometimes grainy colour images can look great – look at Anton Corbijn’s colour pictures as an example – but in my own work, additional grain and colour noise in colour photographs tends to look muddy and unattractive.
Taking these things into consideration, I generally have a lot more trepidation when shooting expired colour film, and the faster the film, the worse these things can become as the addtional sensitivity can increase the possible deterioration.
For this installment I chose a roll of Kodacolor VR 400 which expired in May 1989, so 33 years past it’s recommended best when I shot it. As I don’t know how the film has been stored throughout it’s life I used the generally accepeted rule of thumb to overexpose it for one full stop for each decade of expiry and metered it at 80asa.
As with the last roll of expired film I shot, I decided to use my Yashicamat 124G again. This time though I decided to stay relatively close to home for the shoot and headed out to the local country park, which is about ten minutes away by foot. The weather was nice and bright but as I was shooting at 80asa I took my tripod with me in the event I needed to use slower shutter speeds. I managed to forget a cable release but, thankfully, none of the exposures was slow enough to be impacted by any camera shake from my pressing the shutter button with my finger.
All the shots were made either on my way to the park, at the park, or on the way home, all in the space of an hour or so.
As I don’t develop my own colour film as yet, I took the exposed roll to my local lab. I had a momentary pang of disappointment when I was told that it might have to be developed in B&W chemicals if there was a risk of the old film contaminating their C41 chems, but I was happy to discover colour negatives when I collected the developed film the next day.
The negatives were scanned at home on my Epson V550 flatbed scanner and converted to positive images with Negative Lab Pro. The scans had some noticable colour shifts but this was easily recovered in the conversion process. The resulting images are vibrant with good, albeit perhaps not completely accurate, colours. There is increased grain, most notably in the shadow areas but given the age of the film, nothing too bad.
I was very pleased with the results and managed to get twelve very useable images, with a few that I especially like – the shot of the steps being my particular favourite.
The first shot on the roll and perhaps the one that most noticeably shows the worst of the colour shifts.
I tried to shoot with wide apertures where possible, mostly because I don’t tend to shoot that way with te Yashicamat much, but usually like the look when I do.
More use of a shallow depth of field.
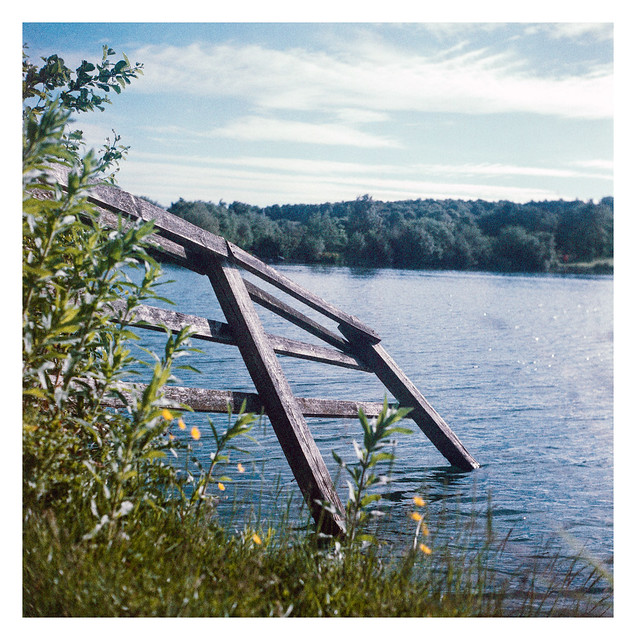
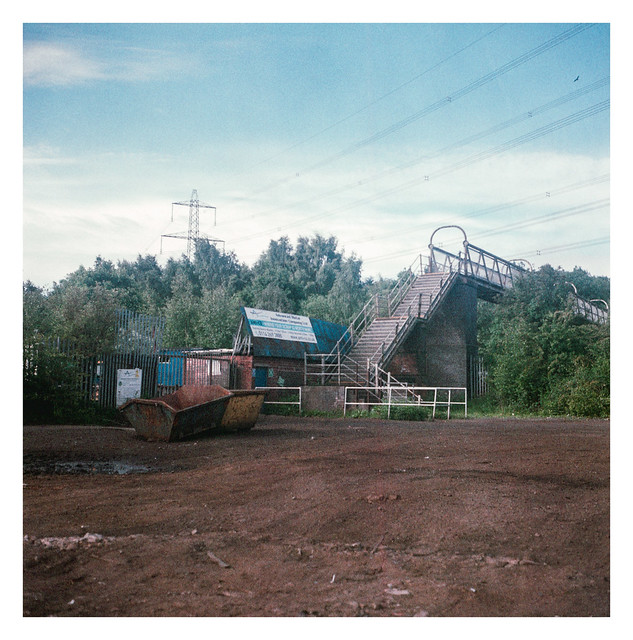
I’ve photographed this short stretch of fence in the water on several occasions. It always tends to produce a picture I like.
The water here was a lovely aquamarine to my eyes but it hasn’t been captures well in the photograph unfortunately.
Another favourite from the roll. The greens of the grass look lush and the shallow depth of fiels makes the image pop.
I like this one, but it would have worked better with a shallower depth of field I think. Even at 80asa however, the light was too bright to open the aperture too much without busting the camera’s maximum 1/500sec shutter speed.
I wasn’t sure about this when I took it, but I think the contrast between the bright orange of the plastic netting and the organic greens of the reeds works well.
My favourite from the roll.
I love the richness of the brown soil in the foreground of this picture.
Overall outcome: Success!
Expiriment #3 coming soon…
Yashicamat 124G, Kodacolor VR 400 (expired 1989). Shot at 80asa and lab developed for box speed.
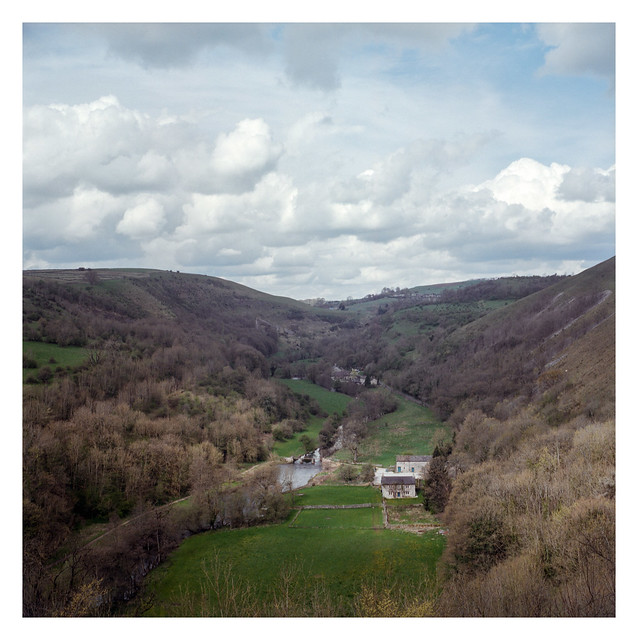
On the day that I visited Ashford-in-the-Water, I also drove up to Monsal Head, a scenic viewpoint which overlooks a stretch of Monsal Dale where the valley takes a sharp bend. As with Ashford, the River Wye flows through (and indeed, eroded) the dale here too, a few miles upstream from the village.
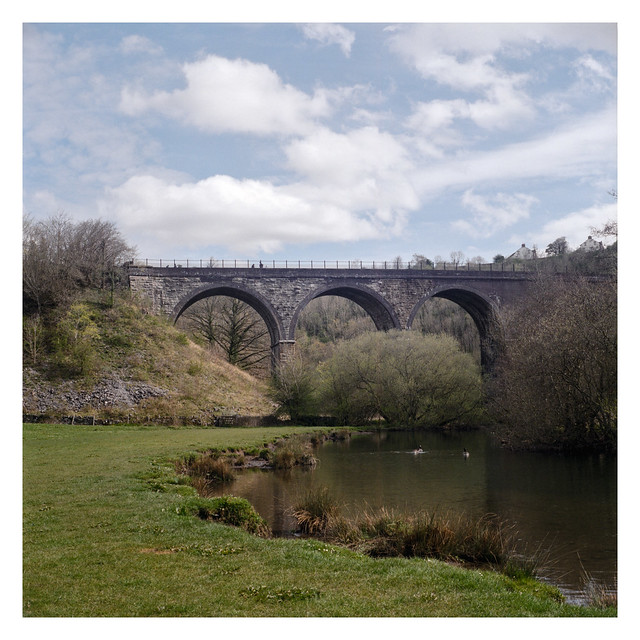
One of the main features of the valley is the disused Headstone Viaduct which used to carry the Manchester, Buxton, Matlock and Midland Junction Railway. The line was open between 1863 and 1968. The route of the railway now forms the Monsal Trail, a popular route for hiking and cycling. The viaduct is 300 feet in length and 70 feet tall.
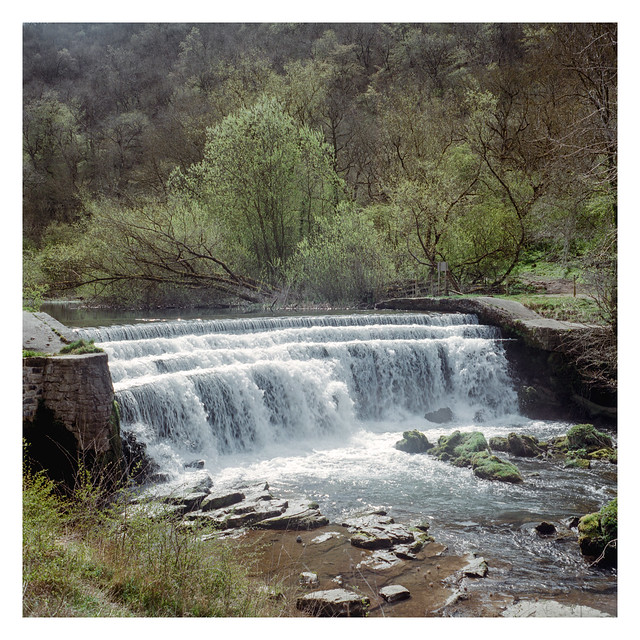
A little downstream from the viaduct a weir slows the flow of the river.
Yashicamat 124G & Fujifilm Pro 400H. Lab developed. Home scanned and converted with Negative Lab Pro.
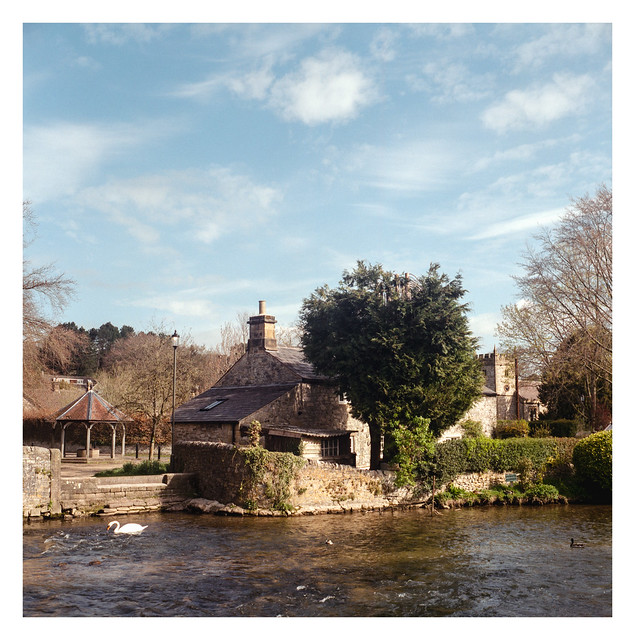
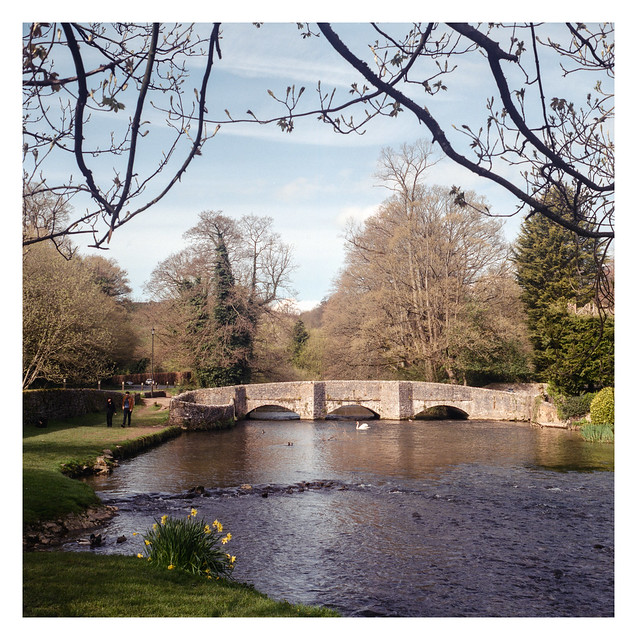
Three more photos from Ashford-in-the-Water, all taken on the banks of the River Wye where it flows past the edge of the village. It’s really quite picturesque.
The bridge in the third image is Sheepwash Bridge, a 17th century packhorse bridge which is a Scheduled Monument, giving it legal protections from modification. To the left of the bridge in the image is a stone pen. Lambs would be places in this pen so that their mothers would be enticed to swim the river to get to them. As they swam they would be pushed beneath the surface to clean their coats before they were sheared. There were no lambs in the pen on this day, although there were a couple of ducks.
That’s the same swan in all three shots. 🙂
Yashicamat 124G & Fujifilm Pro 400H. Lab developed. Home scanned and converted with Negative Lab Pro.
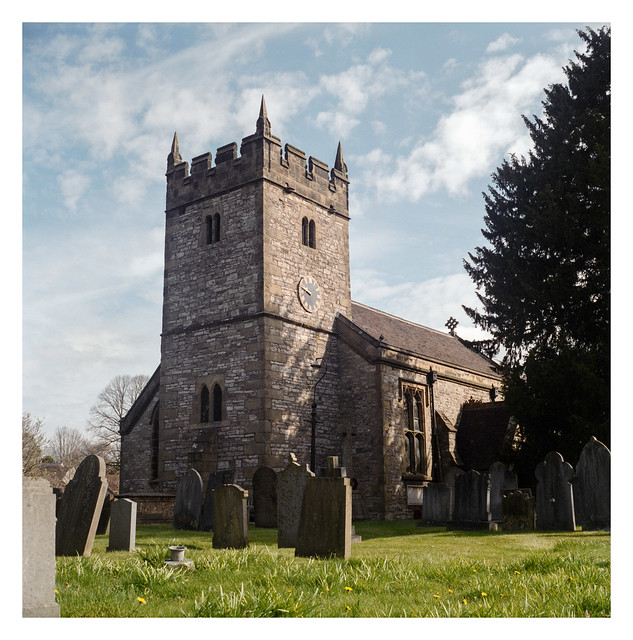
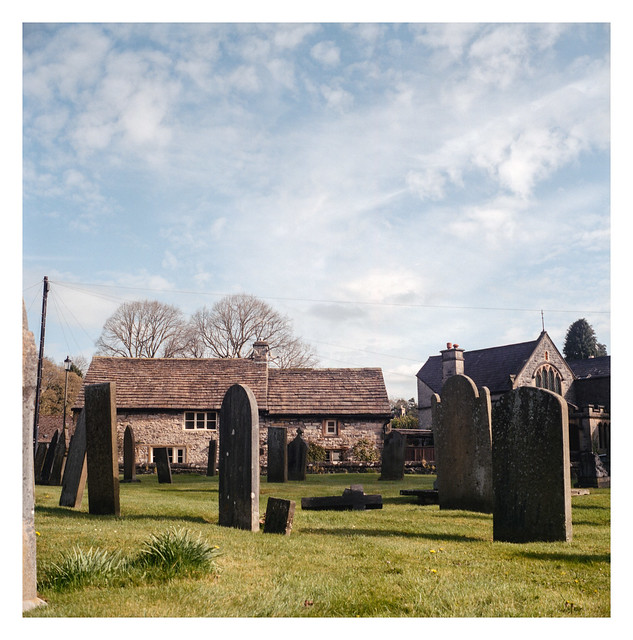
Just a quick post today with a couple of photos showing Holy Trinity Church in Ashford-in-the-Water, and a view across its graveyard. The church dates back to the 12th century but was apparently re-modelled extensively in the 19th century.
Yashicamat 124G & Fujifilm Pro 400H. Lab developed. Home scanned and converted with Negative Lab Pro.