I took a trip out with the Chamonix 4×5 camera last weekend. I had two reasons for doing so. The first was that I had some free time, the weather was nice (even if the skies were a little too clear this time), and I wanted to go out and take pictures. The second reason was to shoot some pictures without my yellow filter to see if I would still get any out of focus areas without it being used.
The answer to the second was that, no, I didn’t, which is a relief. I did get some out of focus areas, but these were ones that I can explain away to camera operator failure. 🙂
I went out to North Leverton Windmill and took five photos there, some of which I’ll publish here in due course. After photographing the windmill I headed over to Sturton-le-Steeple to shoot my final sheet of film, with the idea of photographing West Burton Power Station which sits a mile ot two away, taking advantage of the nearby River Trent.
I did take a picture of the power station but with the Bronica, which I’d also taken out with me, and which had my 150mm lens, giving a better view of the station (one day, I think I’ll go for a walk around the power station, and try to get some nice atmospheric pictures from closer range – there are a whole bunch of public footpaths surrounding the facility).
In the end, I shot my final sheet of Fomapan in the village itself, with the church as the subject, and it has come out quite well. A functional yellow filter might have added some more “pop” to the skies and, annoyingly, the new box of Fomapan I’ve just received appears to have the same issue with white speckles on the negative that I’ve encountered before, which means I now need to try and get a refund and the messing around that will entail. I think I might stick to Ilford film in future, even though the cost is higher.
My final shot taken while using the knackered yellow filter. As with the other pictures shot with this filter, there are unusual out of focus areas on the image – in this one, it’s the trees (and part of the bridge suspension cables) beyond the front of the boat. The filter is now in the bin.
This vintage ice-cream truck was parked close to the car park when I visited the Humber Bridge and made for an obvious subject for a picture. Annoyingly, it’s another shot marred by the out-of-focus issue that I wrote about yesterday, and I still have another two sheets to develop where I also used the yellow filter that I suspect to be the cause, so those might also exhibit the same problems.
A couple of pictures from a recent trip to the Humber Bridge. For once I actually got nice conditions, with plenty of light and also an interesting sky, helped quite a lot by a yellow filter. I did have to hang around for awhile on occasion when the sun was obscured behind clouds, but I can’t really complain.
I’m happy with these two pictures but, again, there are issues with the focusing, with the far tower of the bridge being out of focus in both images, even though I’m pretty certain I checked it was ok before taking the picture. I’m wondering if it might be the way I use my loupe to focus and so I’ have’ve made some changes to this proces ready for my next 4×5 outing. Fingers crossed.
Another large format shot. And another with faults, this time some out of focus elements in the middle right of the frame. I’m not sure whether this might not just be a gust of wind blowing the power lines and trees about though. I’ve had similar issues with other shots however, including some I’ve just developed, so it could well be something else causing it. More (time consuming and tedious) trial and error work will no doubt be required. So far I have to say that it’s the promise of large format that is keeping me going rather than the actual process – 35mm and medium format are sooo much less faff!
Still, the problem in this picture is barely noticeable unless you start pixel peeping, and otherwise I like the picture. Maybe I should give myself a break. I used a yellow filter here which has really given the skies some nice contrast.
Last week, when I had a few days off work, I decided to go and shoot some more sheets of film with my large format camera. It’s been over six months now since I first got a 4×5 camera, and in that time I’ve bought two of them. This wasn’t my original intent but, due to problems with the first camera that I was unable to resolve I was left with two options. The first, give up on large format, wasn’t really an option as I’d invested in all the associated kit that goes with the format (plus I didn’t want to give up on it). The second option was to bite the bullet and buy a replacement camera and, thanks to finding a used Chamonix model at a good price, this was the route I took. There was actually a third option too – to borrow a camera from someone, and this is what I’d set out to do before I found the Chamonix. In fact I’ve still been loaned another camera and a couple of lenses, meaning that I’ll soon have shot three large format cameras in this relatively short period of time!
However, shooting large format is not something that can be done on a whim. While 35mm and even medium format cameras can generally be picked up and taken out to make some pictures quickly and easily, large format demands much more of my time, both in terms of setting the equipment up to make a picture, and also in preparing for an outing in the form of loading film into holders using a changing bag. No grabbing a roll of film and quickly dropping it into the back of the camera with this format!
What this has meant is that I haven’t really been out with a large format camera all that many times and so I’m not well practiced in using the gear. I know what I’m doing, but I’m not very good at it yet, which means I tend to make mistakes every time I do have a session. Not major mistakes usually, but enough to reduce the quality of my work to some extent. Still, practice makes perfect, so I try to get out and use the large format when a suitable opportunity presents itself.
I had hoped that last week would be such an opportunity as the weather had looked promising, but it turned out to be less optimal than I’d hoped in the end. I decided to visit Magpie Mine in the Peak District, a place I’ve photographed before, and which I thought might be promising for some 4×5 photographs. The day had a cloudy sky, albeit one with plenty of texture and relatively frequent gaps where the sunshine would break through. With smaller formats it’s relatively easy to take advantage of the good light when it fleetingly appears. Not so much with large format as, by the time you’ve set everything up, the light has changed again. This was made even more difficult by a brisk wind that was present. While the camera wasn’t being blown about too much (although I did lose one shot due to camera shake), the darkcloth that I use to be able to see the ground glass on the rear of the camera was whipping around like a dervish and making it very difficult to check composition and focus.
While there was the occasion splash of nice light, I didn’t have the skill (or patience to wait!) to make use of it, so the shots I took at the location are a little flat. I’d planned on shooting more images while there, but the conditions (well, the wind) meant I decided to head off to somewhere in a more sheltered position.
Of the three shots posted here today, the first is probably the best executed. The focus is good across the piece and, while the lighting could be better, the subject isn’t harmed by it too much. The second picture is my facourite in terms of composition, but I wish I’d closed the aperture another stop as the distant buildings aver a teeny bit soft (although the wall in the forground and the building at middle distance are both fine). The final picture of the lone chimney, was a bit of an experiment. I wondered how it might look shot wide open at f/5.6. However all this has done really is soften the foreground grass, add a noticeable vignette and, because there was probably a bit of tilt on the front standard that I neglected to check properly due to my frustration with the wind, has thrown the top of the chimney out of focus too. Still, as I’ve already said, practice makes perfect, and every time I use the camera it’s a learning experience!
I photographed this same scene last summer on a much nicer day, that time using my Yashicamat 124G and some Fuji Pro 400H. This version is shot on Ilford FP4+ with my Chamonix 045N-1 large format camera. This one has much more resolution, but the earlier colour pictures look nicer I think.
I guess the title of today’s post fits a couple of things that I’ve done in the past two days with regards to the large format photography I mentioned in yesterday’s post.
The first is the exposure of the picture below – and I mean the exposure – because it was certainly based upon little more than guesswork and crossed fingers. That’s not to say that I didn’t make some effort to meter the scene as best I could, but it was a mixture of bright highlights and dark shadows and all I had was my Sekonic L-308 incident meter and the light meter app on my phone. Ideally I would have had a spot meter to correctly assess the scene and put everything into the correct “zones”. But I don’t own a spot meter, and have nought but a basic understanding of the zone system in any case.
So instead I used a couple of methods to try and guage the exposure. The light meter app on the phone was used to see what it gave me for the whole scene, and then for the brightest and darkest areas. It’s not a precise as a 1° meter, but it gave me some readings. I then repeated the process with the L-308 in it’s reflective mode. The readings from both were in the same ballpark roughly, but not really precise, and I was getting exposure settings at between 8 seconds and 1/30th of a second at f/22. In the end IU decided to chance it on a 2 second exposure. Again, some degree of winging it was required as the longest exposure on my large format lens is 1 second, so I had to use bulb and “Mississippi” it.
The other area of wingmanship to take place was with regards the development. Because one of the unit sizes for 4×5 film is 25 sheets, and because my developing tank takes four sheets at a time, there will come a time where I have a stray sheet of film left from a box. On this outing I had three. All different stocks! I could develop then individuality, but I find developing film something of a chore at the best of times, so I wanted to see if I could combine all three sheets (Ilford HP5+, Ilford FP4+, and Fomapan 100) in one session.
My first though was to use stand development – something I’ve not tried before – but then I discovered that, if I pushed the Foampan 100 by a stop, it would take 9 minutes in an Ilfotex DD-X 1+4 solution – the same as HP5+! The FP4+ was trickier as it takes 10 minutes in the same developer at it’s 125asa box speed. So I decided to pull it slightly and meter it at 100asa – barely any difference really, but hopefully enough to compensate for the shorter development.
So today I developed all three sheets for 9 minutes in DD-X. And they all look fine.
The church interior shot did need some additional work in Photoshop. Although there was plenty of dynamic range captured, the scan would either feature blown highlights in the window, of very deep shadows (or a halfway house that looked a bit muddy). So, in the end I made two scans, one exposing for the window, the other for the interior, and then merged the two to allow me to get a better overall exposure. It’s still a bit noisy in the shadows, but I can live with that (although I did notice that Epson Scan seems to have been delivering JPEGs rather than TIFF files recently, so I must hace altered a setting at some point. I’ll make sure my next scans are set back to TIFFs and not whether that improves shadow noise.
I’ll post the other two shots from the multi-development session when I’ve uploaded them to Flickr, but in the meantime here is the church interior photograph – taken inside Holy Trinity Church, Ashford in the Water.
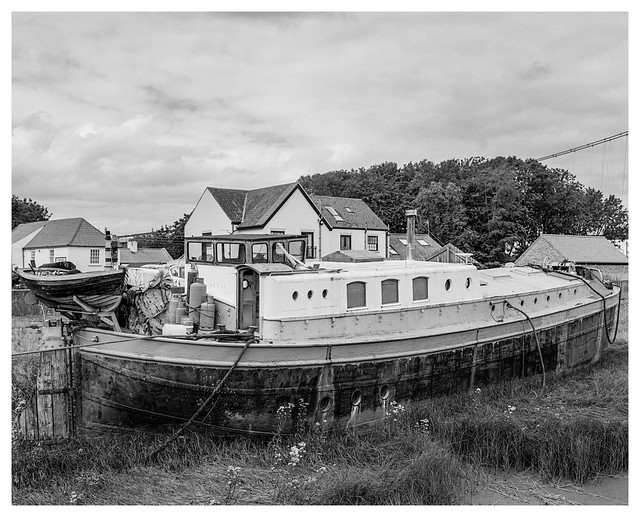
I’ve photographed the straddle wharf at Victoria Quays on many occasions, but this is the first on 4×5 large format.
I still need to learn more patience with the format as, although this is a picture I’m happy with, there’s still a little softness in the upper part of the image where the front-standard must have had a slight bit of tilt in play. It only affects the roofs of the buildings and the upper branches of the tree, and everything through the middle of the scene is sharp from edge to edge. It would have been preferable had the tilt been reversed and the softeness had affected the water, where it would have had little noticeable effect. The soft focus is only really noticeable at magnification and I doubt you can see it in the smaller res version published here.
I didn’t rush this picture (I have one that I did to show in the next day or so though, so don’t worry, you’re not missing out!), but I also didn’t spend enough time fine tuning the focus. I think I might consider buying a more powerful loupe – the 4x magnification model I have is very good, but perhaps a 6x would better ensure I don’t miss the detail?
I had a day off work yesterday and decided that I would take my Chamonix 045N-1 for a second outing. After my initial test a couple of weeks or so back, I felt confident enough to take a slightly longer trip out into the Peak District. By some miracle, the weather was actually good too – warm, with plenty of sunshine and cloud. There was a risk of rain predicted but not until later in the day.
My initial plan had been to visit a few locations but, in the end, I only went to a single spot as I soon discovered that, despite everything else, there was still sand in the gears (not literally!).
I drove out to Surprise View car park in order to photograph Mother Cap, a large gritstone outcrop, and then to photograph the birch woodland in the same area. Although Mother Cap isnt too far from the car park, it is quite a bit higher and the footpath requires some scrambling over rocks – nothing too challenging, but still enough to work up a sweat when you’re carrying a big tripod and a heavy backpack.
The first two shots went well, I thought, although I found focusing a little difficult because I had fitted a yellow filter to the lens (note to self, focus before fitting the filter enxt time). As it turned out, I managed to get some camera shake on the first shot, probably because the tripod was stood on springy heather covered ground and wasn’t stable enough.
The next shot was taken on firmer ground but the issues with the filter meant that there are a few minor focusing problems where I hadn’t set the camera movements as well as I might. It was at this point that my cable release also broke, the threading on the end somehow coming undone slightly, so the next shot had to be taken using the shutter release on the lens without the benefit of the cable. It was at 1/60sec though, so it came out ok. I’ll post these two pictures tomorrow.
The final shot I took was of the birch woodland. This time the camera was placed in a stable spot, and I managed to finagle the cable release enough that it functioned properly again (although I’ll be using a different one in future AND taking a spare). Despite this, a new problem came to bear…
Because it was a warm day with hot sunshine, and because I was quite hot from hiking around with my gear, I now found that beiing under the darkcloth for more than about ten seconds resulted in my spectacles completely steaming up, rendering any attempt to focus of check the scene nigh on impossible (and made even more difficult by the yellow filter).
I did my best with it, but it wasn’t good enough, and the resultant image has a number of problems with soft focus in various parts of te scene. Thankfully it’s not terrible, but it’s not what I wanted. I do like the resulting picture though and it might be worth another visit to try and get a technically better result.
Here it is. It probably looks fine on a small screen, but it loses a lot of sharpness when viewed large.